
Perfect plant milk – an oat/almond blend
How cool is starting your blog with a recipe for the perfect plant-based milk? At least as cool as the refrigerated milk itself I’d say.
I started drinking plant milk about seven years ago, and I fell for oat milk from the start. While almond milk seems to be the number one type of plant-based milk in the US, here in Sweden, it’s oat milk that makes the largest splash – or well, if you drop something into the milk it will make a splash. Or, uh, ok, forgot the splash part.

The soaked, and rinsed oat/almond blend.
One great thing about oat milk, especially making your own, is the price. Even if you live a lot closer than I do to California, where something like 80% of the world’s almonds are grown, I still think it’s safe to say that almonds cost more than oats, no matter where you live. I had a quick look at an online, home delivery shop and organic almonds here cost 10x more than organic oats! At the same shop, one carton of commercial oat milk, costs the same as a huge bag of organic oats. I calculated that making my recipe is about 8x cheaper than buying oat milk in the store.

The calm, before the storm.
And oats, they do a body good! That’s right, oats are very healthy. Oat milk contains over 20 different vitamins and minerals. It has the same amount of calcium as cow’s milk and twice as much vitamin A! At the same time, oat milk has fewer calories and nearly no saturated fat.
Despite that, I can’t deny that almonds too have a whole lot of goodness in them, and they also result in a creamy, full flavored milk. Seeing as how I’m not one to exclude, I thought, “Why not throw a few almonds into the mix and get the best of both worlds!?” So that’s what I did.
After a bit of experimentation I decided on 80% oats and 20% almonds and aim make a good liter of milk. (If you become a regular visitor, I can promise that you’ll learn more about grams and ounces, Celsius and Fahrenheit, and of course, liters, quarts and gallons – you might just end up being an expert in all kinds of measurement systems!)
-

- Nylon bag, fine sieve, cotton bag

-
- Nylon bag in action

There is a whole lot of different information floating around out there when it comes to almonds (and nuts/grains in general) concerning why you should soak them, if you need to soak them, if consumers can buy truly raw almonds …
Apparently, all almonds grown and sold in the United States have to undergo one of several processes in order to pasteurize them. Of the two most common methods, one involves steam cleaning, while the other uses chemical propylene oxide, or PPO. This chemical is a known carcinogen, but luckily, it’s banned in the EU. Steaming is fine, but hold the PPO please! So, if you want to be sure you are getting PPO-free almonds – always buy certified organic ones.
Lucky for me I recently got a good deal on blanched, organic almonds. So while they are not truly raw, the skin is gone, the nutrients are ripe for the taking and not a trace of PPO in sight!

Most people recommend soaking almonds for a variety of reasons: soaking removes some phytic acid and tannins, it neutralizes enzyme inhibitors and it helps make proteins and vitamins easier to absorb. So, if you soak your nuts for at least 8 hours, you should be getting more of what you want, and less of what you don’t want. Oats, thank goodness are the almond’s low maintenance friend and soaking them is less of an issue.
There are two things that you are going to need to make your milk: some kind of blender or food processor, and something to filter out the pulp. The oats/almonds will be soft after soaking, for this recipe you don’t really need to worry about having a super blender – but oh I can recommend buying one! I started out using an organic cotton nut bag (well, because it sounded so natural) but I now prefer a nylon bag. Even a tight mesh sieve will do the job. And hey, if you get a little pulp in your milk, and you will, no biggie at all!

Did I say it goes great with peanut butter!
To make things easier (simple and easy is always good), I put my oats and almonds in the same bowl, cover them with water and let ‘em hang out, soak together and get to know each other a little better. Instead of soaking them overnight, I normally start soaking them when I get up Sunday morning and make the milk before I go to bed – leaving me with a nice cold bottle of milk on Monday morning, which, if I’m lucky, might just last me the whole week!
The liquid/solids may separate a bit, but this is completely normal. Just shake that baby up, and your good to go!
Ingredients
- 1Cups (2.4 dl) - Organic oats
- ¼ Cup (.6 dl) - Organic almonds
- 1 Tbsp (15 ml) - Maple syrup
- 1 tsp (5ml) - vanilla extract (or roughly ½ tsp vanilla powder)
- 1 pinch of salt
- 4 - 4½ Cups (10 - 11 dl) water
Instructions
- Put the oats and almonds in a bowl, cover with water, and soak for around 8 hours/overnight.
- Pour the oats/almonds through a sieve and rinse rinse rinse. Trust me here, rinse some more.
- Put the soaked oats/almonds in a high-powered blender and add 4+ cups of water. Blend on high speed for 1-2 minutes. (4 cups is the same as one liter - I add just a little more than this since you lose just a little liquid in the process.)
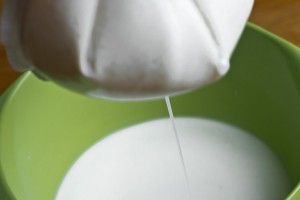
- Place a nut milk bag (or cheesecloth or a very fine sieve) in a large bowl and pour the milk into the bag.
- Depending on your filtration method, you may have to squeeze a lot, or not all. I count on a little liquid loss, so I don't squeeze too too much. (I find that excess squeezing causes pulp to sneak through whatever bag I'm using.)
- Pour the strained milk back into your blender, add the maple syrup, vanilla and salt, and blend for 30 seconds.
- Pour the finished milk into your favorite bottle and store in the refrigerator for 4-6 days.
Maria January 22, 2016 (2:23 pm)
Such a great way to save money, animals and the planet while being very healthy!
Anna March 18, 2016 (7:52 pm)
Thanks so much for your recipe, sounds both healthy and tasteful! If I would like only to use oats and not almonds…can I just replace the almonds in the recipe with oats or do I have to add any other ingredient?
Chris March 19, 2016 (10:38 am)
Hi Anna, I’m glad you like the recipe 🙂 You can use only oats if you want. I think normally people use around 1 cup of oats to 1 quart or water. Since I have quite a big milk bottle, which holds just over a liter, I add that extra 1/4 cup, but it’s not totally necessary – it just makes the milk a little thicker and creamier.
Clarissa March 25, 2016 (8:53 pm)
I’ve tried a few oat milk recipes so far and nothing really convinced me to skip the factory made oat milk. Maybe this one will, sounds good!
Just one question, because I can’t really see it in the pictures: is it rolled oats or whole oats, as in the whole grain? Thanks 🙂
Chris March 25, 2016 (10:38 pm)
Hi Clarissa, I’d have to say that the biggest reasons to do-it-yourself is: 1) You can! 🙂 2) It’s SO much cheaper 3) It tastes amazing! I use organic rolled oats.
Elizabeth June 5, 2016 (6:18 pm)
I am definitely going to try this. I have almonds soaking right now, but there are too many to make this recipe this time, but the next time there will be oats also!
Chris June 7, 2016 (11:49 pm)
Hi Elizabeth, that’s great to hear 🙂 I love oat milk and think the combination of oats and almonds is perfect. Hope you do, too!
Mira April 25, 2018 (4:15 pm)
Good work done there. What if I don’t want to use the maple syrup
Chris May 6, 2018 (12:59 pm)
Hi Mira,
Thanks for writing. You don’t have to use any sweetener – it’s just a matter of taste 🙂
Robin June 7, 2019 (6:59 pm)
I like this recipe…easy and tastes great. However, it does not contain as much calcium as cow’s milk, if that is the goal (which I doubt). Cow’s milk contains about 300 mg of calcium per cup. Looking at this recipe, the almonds contribute about 75 Mg and the cup of oats contribute about 60 mg. That is far less than cow’s milk.
Chris September 14, 2019 (9:37 am)
Hi Robin, Thanks for writing. As you guessed, this isn’t about getting a lot of calcium. Eating plant based, one can get calcium from nuts, peas, lentils, soy, spinach and a number of other sources. The aim here is to have something you can use for your breakfast cereal, when cooking, or just to enjoy as a refreshing drink!
Simran December 1, 2019 (7:07 am)
I was so happy to have stumbled upon this recipe! However, when I attempted to make it mine still had a bit of a gooey texture.p I’m not too sure why this is. ?
I soaked the almonds overnight but the oats only for an hour.
Chris December 23, 2019 (8:32 pm)
Hi, Thanks for writing. It sounds like you didn’t rinse the oats enough. You really have to rinse and rinse and rinse them some more them after soaking. You can use more oats or fewer oats to make the milk thinner/thicker, but any kind of “slimy” mouthfeel in the finished milk is usually a result of not rinsing the oats enough. Give it another try – I make it every week along with the granola! //Chris